
Nature photography is a great way for new photographers to simultaneously brush up on their skills and get impressive results. If you’re just starting out, here are four of the best nature photography tips for beginners.
Know Your Camera
If you’re brave enough to go camping in bear country, we believe you’re brave enough to abandon “Auto” mode. Auto is not your friend. Sure, you can use it to fire off a quick shot. However, there’s no guarantee it’s going to capture the scene exactly the way you want it to.
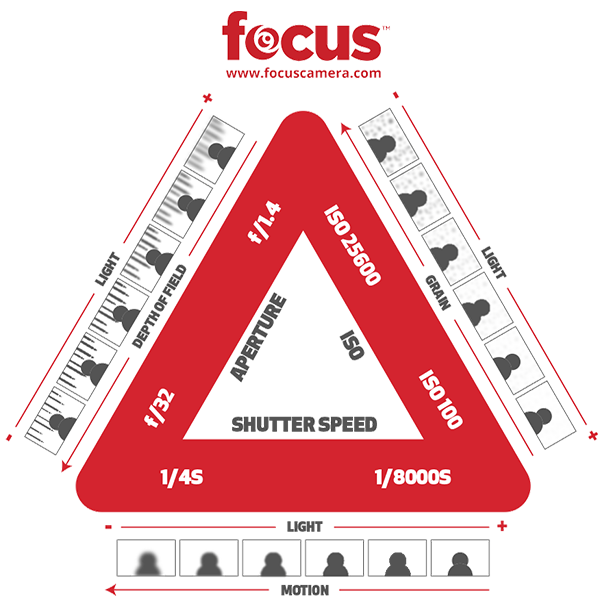
A good start is learning about the exposure triangle which consists of aperture, ISO, and shutter speed. It’s much less scary than it seems. The key is understanding that those three settings work together to adjust exposure and control the flow of light entering your camera. You can learn all about it in our Exposure Triangle Beginner Guide.
Most importantly, get out there and practice!
Master Long Exposures
We’ve all seen the photos of smooth, rushing water cascading through impossibly beautiful landscapes. To capture this effect (and many others) try experimenting with slow shutter speeds.
As a point of reference, an example of a fast shutter speed would be 1/1000 or 1/500 whereas a slow shutter speed would be something like ¼, ½, or 1. To take the shot, first, choose your exposure time. Then, set your camera up on a tripod to eliminate blur from shaking hands (you might even want to look into a remote shutter release). Finally, take the photo. It will probably take some trial and error to get the right angle and exposure time so don’t get frustrated if it isn’t the perfect shot right away.


The Rule Of Thirds
If you’ve ever taken an art class (or know someone who enjoys showing off at museums) you’ve probably heard of the “Rule of Thirds.” At its core, the Rule of Thirds dictates that you place the focal point of your shot off-center where the crosshairs of your viewfinder intersect.
The point of the rule is to draw the viewer into the photo rather than glance at the center and move on. In many cases, it makes for a more interesting photograph and an engaging narrative.


Choose The Right Lenses For Nature Photography
You don’t necessarily need a professional camera for incredible nature photography. In fact, if you have an interchangeable lens camera, you can take just about any shot if you invest in the right lens.
Landscape
For the newbies out there, focal length refers to the angle of view or how much of the scene in front of you is captured. In short:
- Short focal length (12-50mm) = wide angle, captures the whole scene
- Long focal length (55-200mm+) = narrow angle, captures less of the scene
So, if you’re shooting an expansive landscape, it calls for a wide angle lens or a wide-angle zoom lens. As mentioned above, the lower the millimeter number, the wider the view will be.


Close-up/Portrait
If you are shooting a portrait of a flower or doing macro photography, buy a lens with a long focal length and a low f-stop number. If you look at the exposure triangle above, you’ll notice the f-stop diagram on the left. As you can see from the explanation, the lower the f-stop number (f/1.4) the blurrier the background.
The combination of those two specs means that you’ll be able to take close-up photos with blurred backgrounds and great bokeh. Two of our recommendations are the Sigma 70mm F2.8 Art DG Macro for Sony E and the Nikon AF-S Micro NIKKOR 60mm f/2.8G ED Standard Lens.


That wraps up our 4 nature photography tips for beginners. Check back for updates and more info on how to photograph the great outdoors.
-
 Regular price: $469.00
 -
 Regular price: $596.95
 -
 Regular price: $369.00
 -
 Regular price: $399.00
 -
 Regular price: $84.99


